# Geilo Winter School 2026
Welcome to the Geilo Winter School! To participate in some of the hands-on sessions, you need a valid user account on the national Sigma2 e-infrastructure and access to our specific project allocation.
Please complete these steps **as soon as possible** best by end of this week (**January 9th**). On January 12th, 10:00-12:00 (CET) we will run a practical login session to ensure that as many participants as possible can login to Sigma2 HPC resources. See your email for the Zoom-URL to join that session.
Technical assistance with access to Sigma2 e-infrastructure: ask Thomas Röblitz directly via email (thomas.roblitz@uib.no)
---
## Steps to obtain an account on Sigma2's HPC resources
### Step 1: Apply for a user account
If you already have a Sigma2 user account from a previous project, skip to **Step 4**.
1. Go to the **[Sigma2 User Application Form for HPC](https://www.metacenter.no/user/application/form/hpc/)**.
2. Fill in the form using specific information for some of the fields:
* Under Project Information choose **NN14000K: Geilo Winter School** as project
* Under Resource Information:
* choose Olivia and Saga as Resources
* fill in the day you're filling out the form as Account start date
* fill in 2026-01-31 as Account end date
* For the eduPersonPrincipalName if you cannot use Feide (likely international participants without any affiliation in Norway) you may create an OpenIdP account at https://openidp.feide.no/simplesaml/module.php/selfregister/newUser.php. In case of doubt, don't hesitate to ask.
* Ensure your email and mobile number are correct (you will receive a temporary password via SMS).
* Affiliation: Enter your current university/institute details.
3. **Submit:** Your application will be processed manually.
* *Note: Account approval can take up to 1-2 business days, so please apply early.*
### Step 2: Set a password
Once Sigma2 has processed your application, you will receive an email and SMS with instructions on how to set a password for your account.
Please note that the password you receive by SMS is temporary and must be changed within 7 days. After setting a password, please wait 15 minutes for the changes to be applied before log in.
### Step 3: Enable 2FA (two-factor authentication)
* Go to [www.metacenter.no](https://www.metacenter.no/user/otp) and log in using your new password.
* Scan the QR code using an authenticator app on your phone (e.g., Google Authenticator, Microsoft Authenticator, or Authy).
* Enter the code from the app to verify and activate 2FA.
* In case of troubles, don't hesitate to ask for help or check the documentation at https://documentation.sigma2.no/getting_help/two_factor_authentication.html
You can skip Step 4 (we know your username from your application) and can go on with Step 5.
---
### Step 4: Get access to the project account
_Note, only needed for participants which already have an account on Sigma2 ressources._
We need to give your user account access to the project account (NN14000K: Geilo Winter School).
Please, let us know your username.
---
### Step 5: Verify access (SSH Login // web-browser access)
Test your access by logging into the cluster (e.g., Olivia) via a terminal.
**For Mac/Linux Users:**
Open your terminal and run:
```bash
ssh <your_username>@saga.sigma2.no
```
**For Windows Users:**
Use PowerShell, WSL, or PuTTY:
```powershell
ssh <your_username>@saga.sigma2.no
```
For web-browser access: Open apps.olivia.sigma2.no and log in with your username and password.
## Prepare computing environment on Olivia (and Saga)
Logging into Olivia (or Saga) via a web browser provides an easy interface with access to Python through Jupyter Notebooks. During the Geilo Winter School we will also use Julia. Below we describe the steps to prepare access to Julia.
### Step 1: Login to apps.olivia.sigma2.no
Use a web-browser to login into apps.olivia.sigma2.no using your username and password.
After login you should get to a page looking as follows
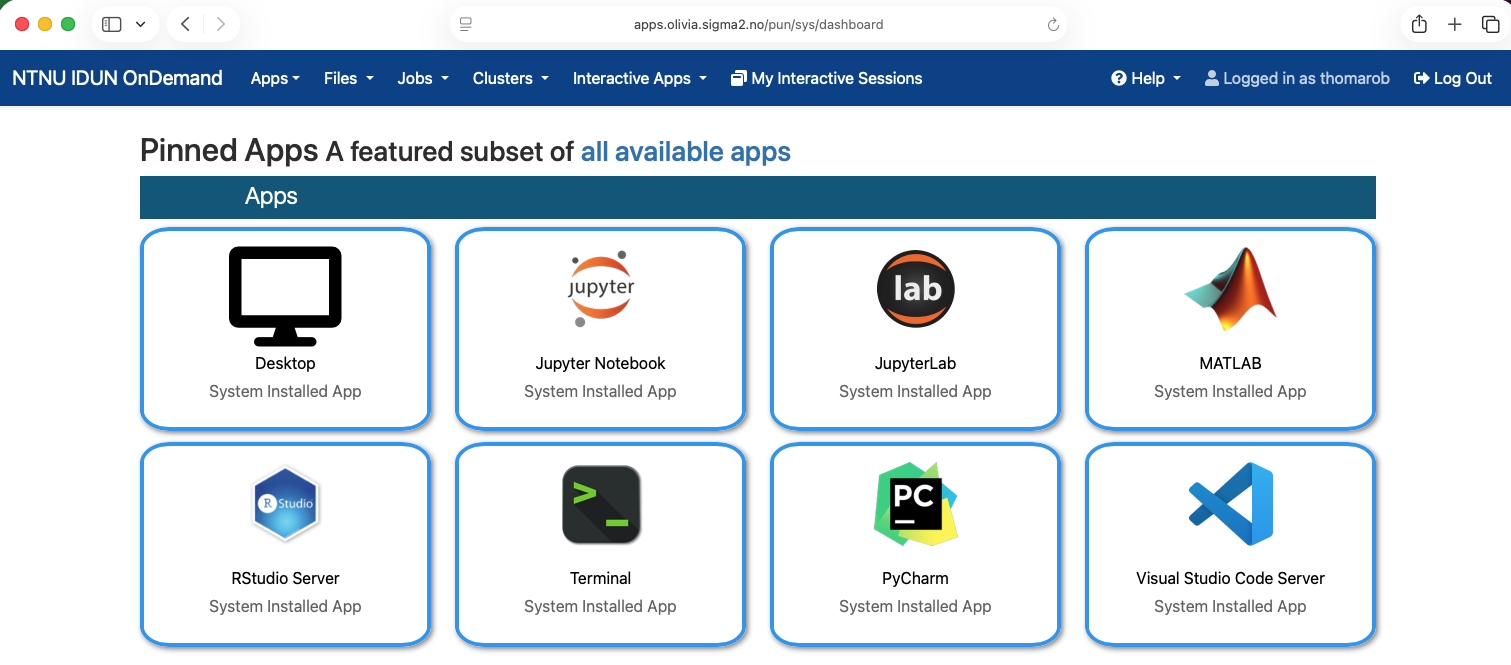
### Step 2: Start JupyterLab on a compute node
Open JupyterLab (single click) and provide information on the Account (NN14000K) and Partition (normal) as shown in the screenshot below
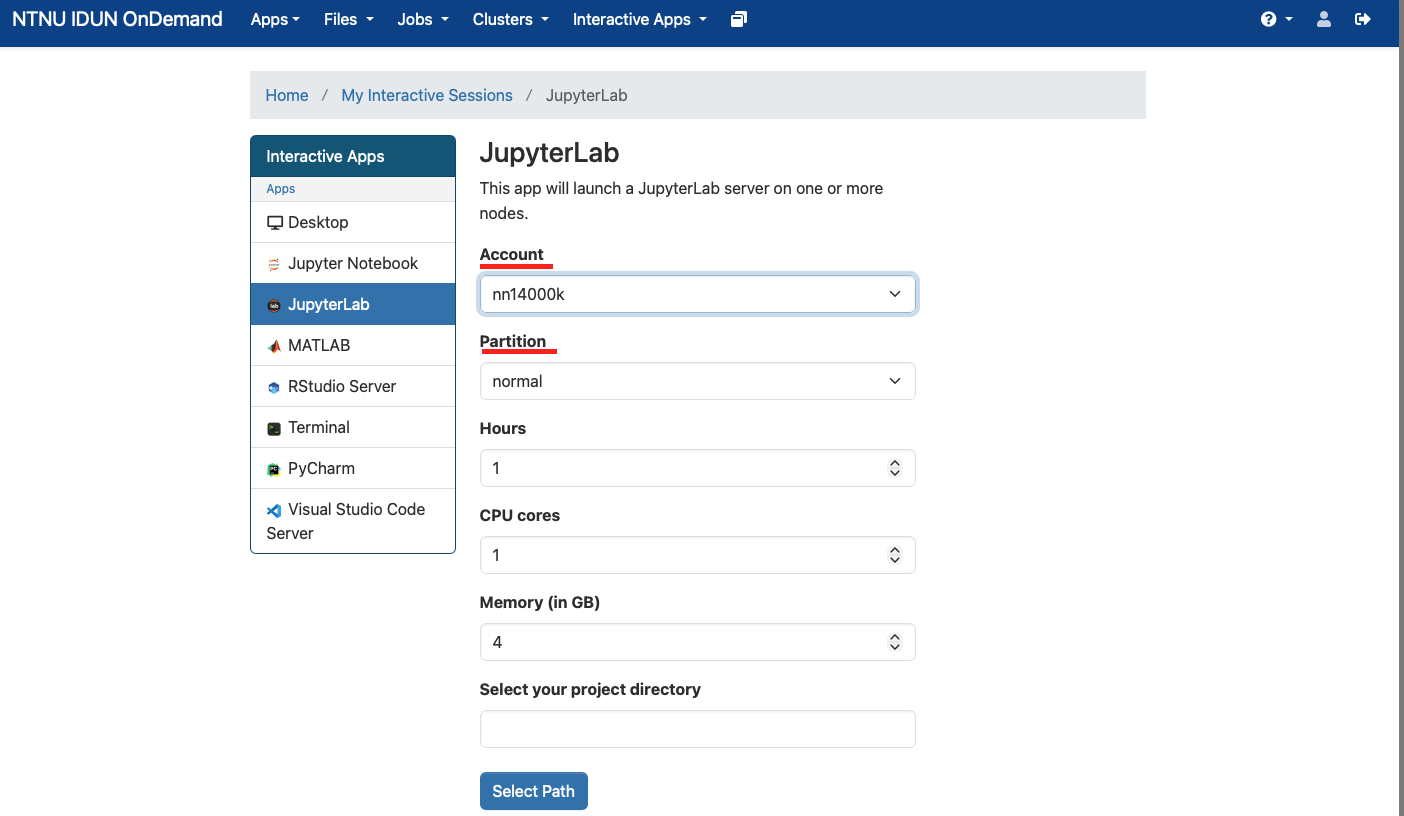
Leave other settings unchanged for now, scroll down and click the "Launch" button to submit an interactive job on a compute node (using CPU-only partition "normal").
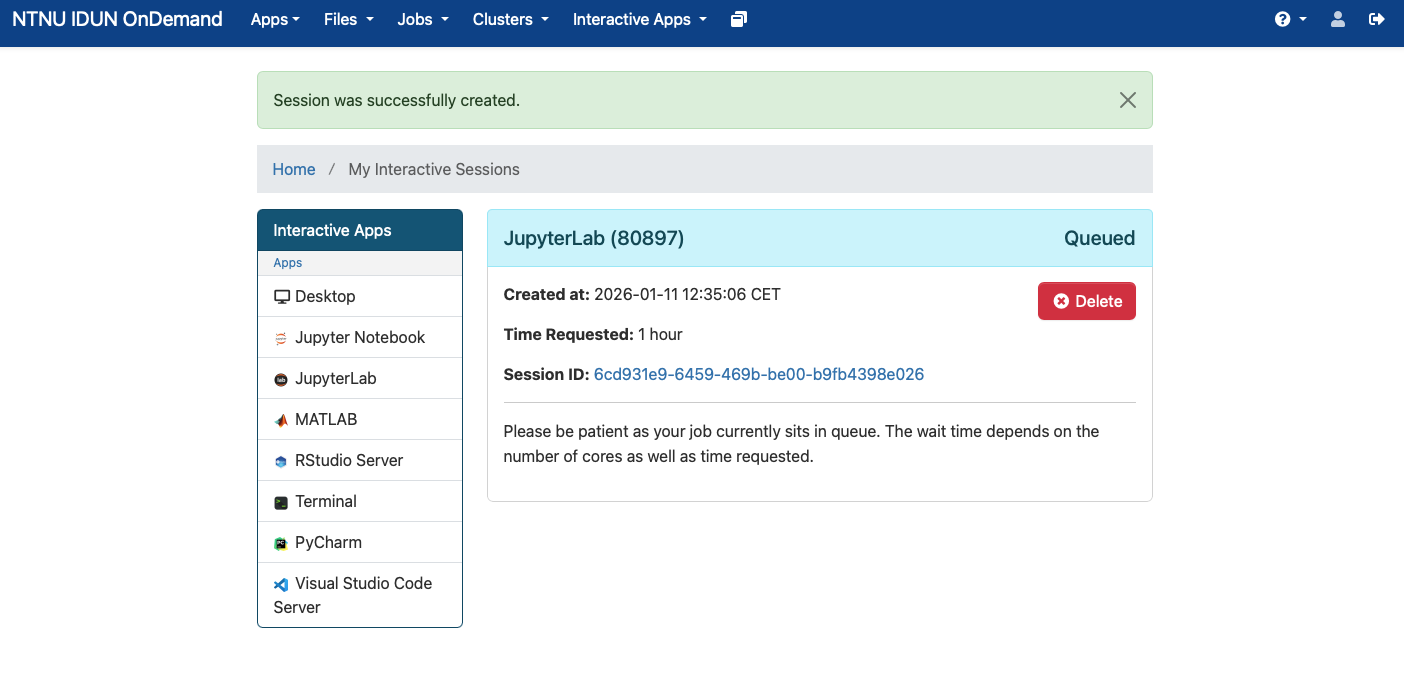
### Step 3: Connect to the JupyterLab
After launching you'll get to a page that informs you about the compute job being queued (waiting to get launched).
When the job is ready it looks like
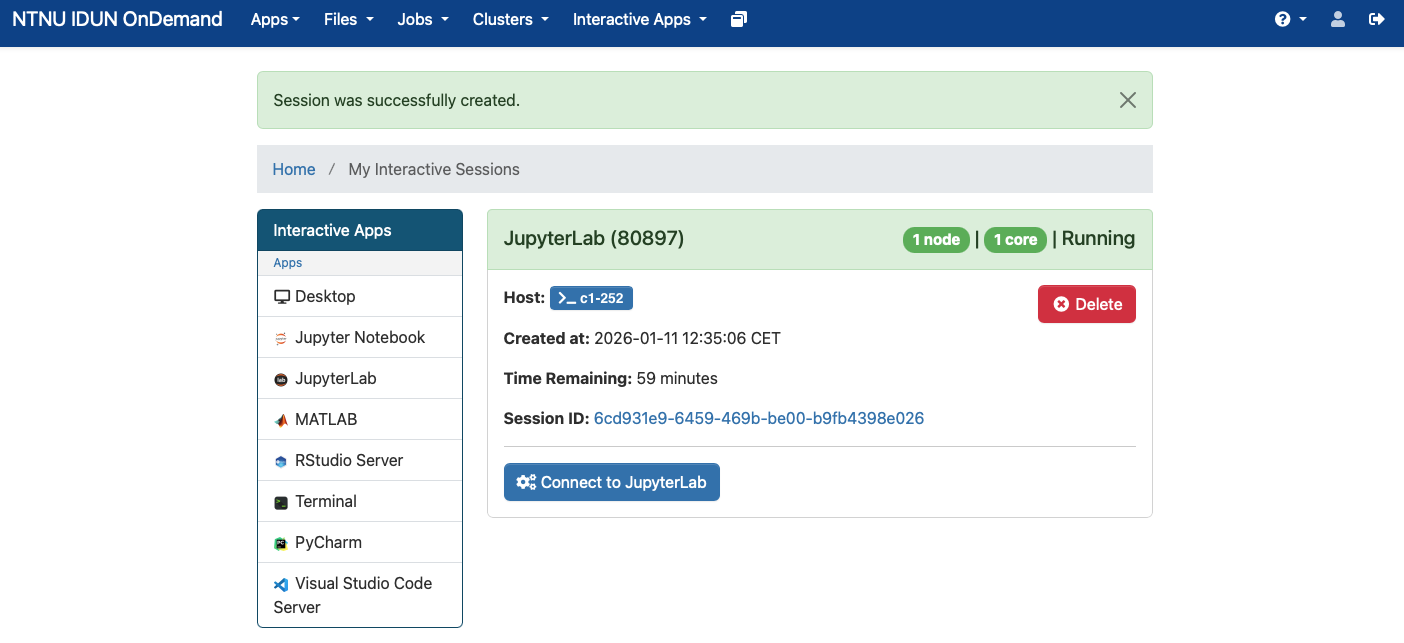
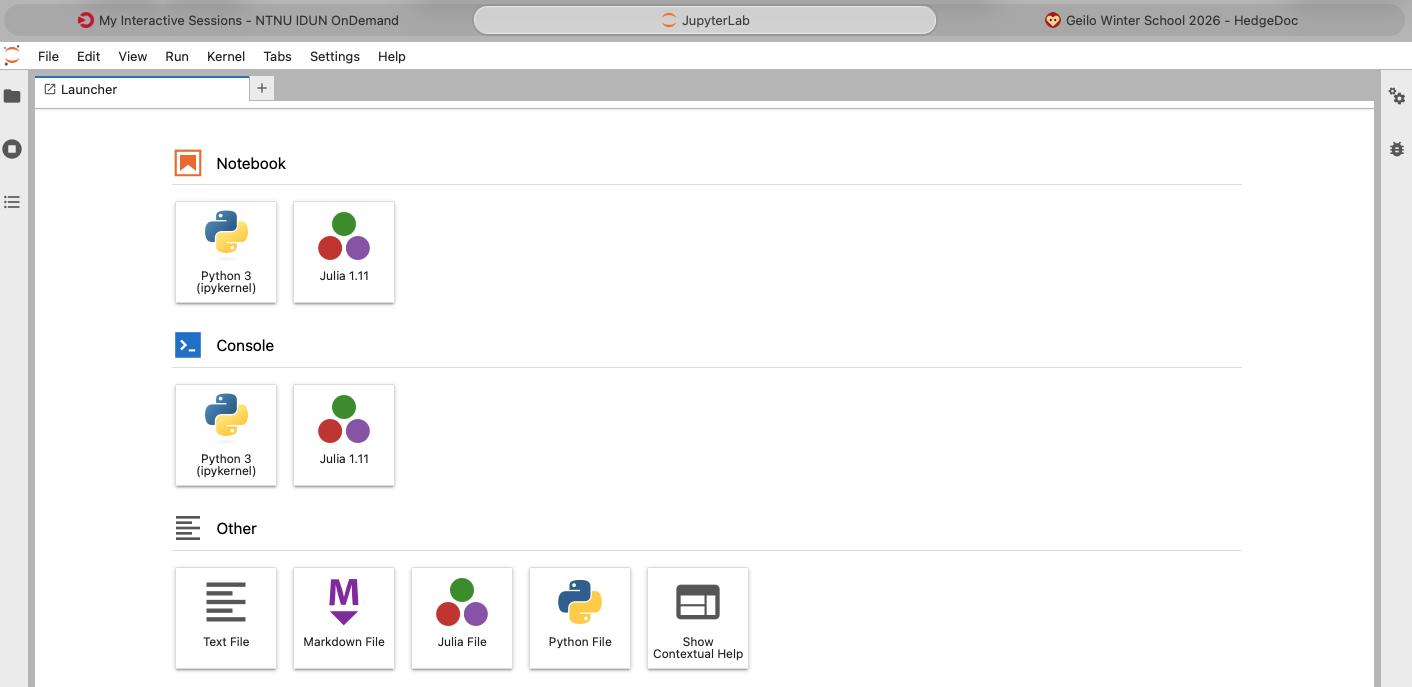
Connect to the JupyterLab via the "Connect to JupyterLab" button. Initially, you'll see the following pre-installed "kernels".

So, Julia is not pre-installed or, better phrased, the environment is not configured to offer what software is already available on the HPC machine. The following steps will ensure you get access to Julia.
### Step 4: Adding support for Julia
Start a Python 3 Notebook and type (or copy) the command below into the first cell.
```shell
!module load Julia/1.11.3-linux-x86_64 && \
julia -e 'import Pkg; Pkg.add("IJulia");' && \
julia -e 'using IJulia; installkernel("Julia")'
```

Run the cell (press SHIFT + ENTER). This will take a while. At the end you should see something like
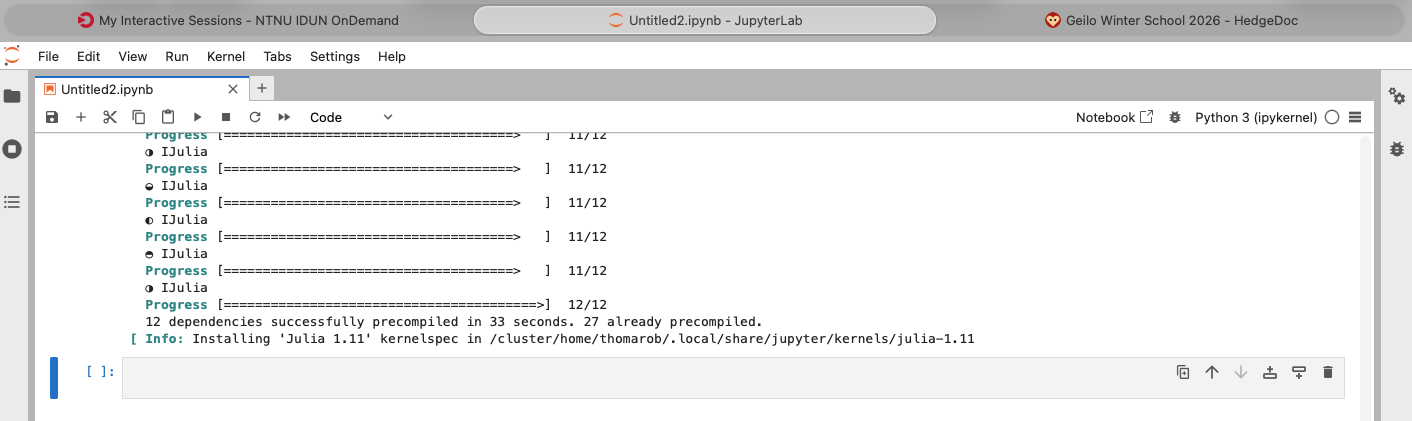
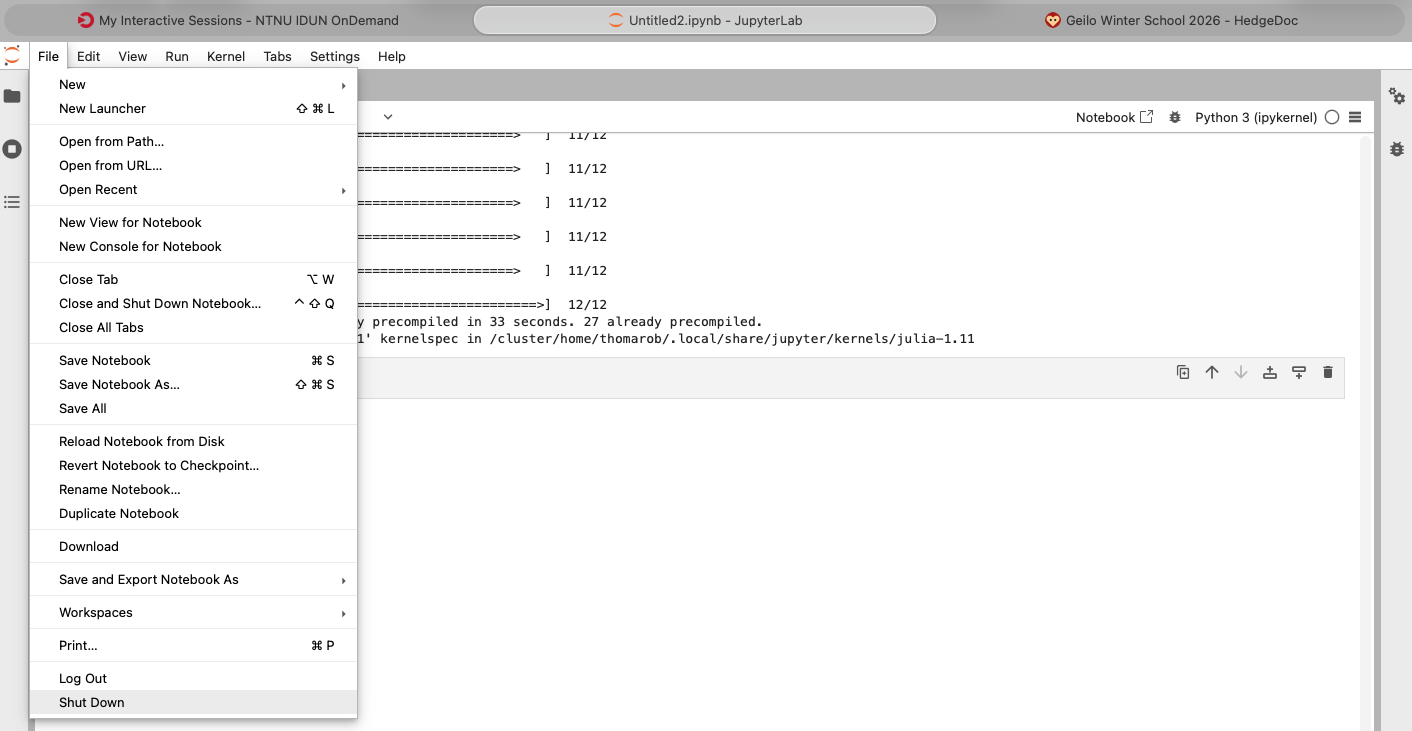
Leave the current job by choosing "Shutdown" under the File menu as shown below
### Step 5: Launch a new JupyterLab session
To get access to Julia, you need to add the following line to the field "Environment setup" as shown below
```
module load Julia/1.11.3-linux-x86_64
```
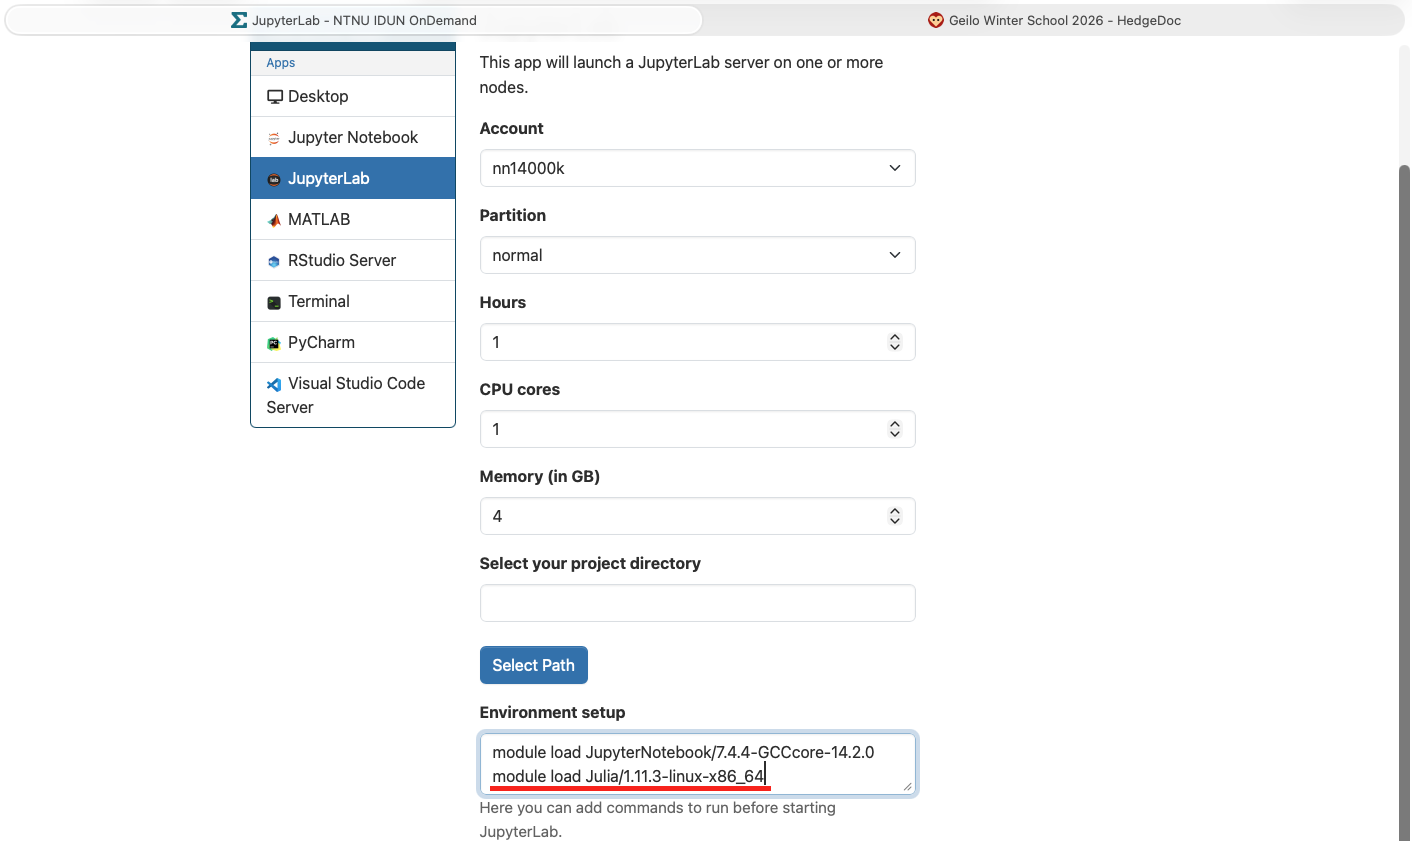
Launch the session (button at the end of the page).
Connect to JupyterLab when it is ready (as in step 3 above).
### Step 6: Get to the launcher page
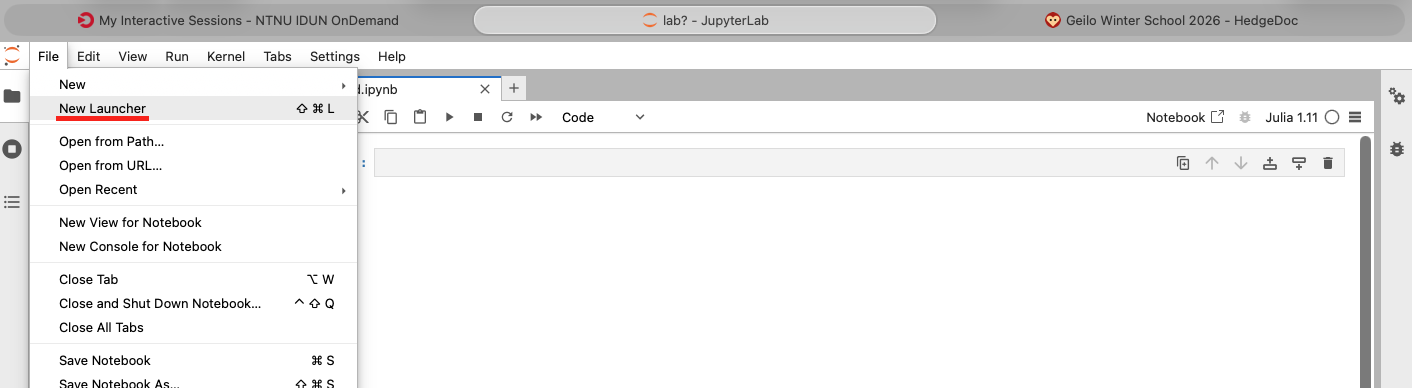
When connecting to the new JupyterLab session you may be presented with the Notebook you had opened last as shown below

To get to the launcher page choose "New Launcher" under the File menu as shown below
Now you should see Julia under the Notebooks section as in the screenshot below
### Note
Steps 1 to 4 have to be done only once, but again for every system you're going to use (and for every partition with a different CPU family ... like Olivia). **Recommendation**, do it once for the "normal" partition on Olivia.
## Exercises for lecture on EESSI
Pick one or two.
**1. Just try EESSI on Olivia (10 minutes)**
- Login to apps.olivia.sigma2.no
- Launch a Terminal app and connect to it
- Run `module load EESSI/2023.06`
- Run `module avail`
- Pick any module of interest, and load it, e.g.,
- Run `module load GCC/13.2.0`
- **Question 1:** How many different GCC compiler installations did you have access to in this short exercise? (inside the Terminal running on a compute node)
- **Question 2:** How many different software installations are available in EESSI/2023.06?
**2. Try to run an EESSI-demo (10 minutes)**
- Login to apps.olivia.sigma2.no
- Launch a Terminal app and connect to it
- Run `module load EESSI/2023.06`
- Run `export https_proxy=http://uan03:3128`
- Download EESSI demos `git clone https://github.com/trz42/eessi-demo`
- `cd eessi-demo/GROMACS`
- Run `./run.sh -nt 1`
- Run it a second time
- **Question:** Is there a difference in the runtime? If so why? If not why?
**3. Use EESSI in GitHub Actions (30 minutes)**
- Assuming you develop some code which is based on EESSI, say it's a Python code. (Estimate Pi, converted from Kjetil's example in Julia)
- While you develop it, you want to run some tests when you push changes to GitHub.
- Fork the repo https://github.com/trz42/PythonUQ
- In your fork adjust the file `.github/workflows/test_python_uq.yaml`
- Replace `MODULE1/2/3` with actual module names that are needed to run the script.
- Hints:
- Determine modules that provide the software you need (python, numpy and matplotlib) by running commands like `module spider python` or `module spider numpy`.
- You may need to run `module spider ARGS` several times refining `ARGS` to determine what module you need to load. Follow the information provided as output of `module spider ...`.
- Replace one `MODULE1/2/3`, then commit & push the changes to your fork.
- Observe results of the workflow run (check Actions tab). The workflow succeeds if all modules that are needed were loaded. Otherwise there will be some error. Try to fix the error.
- The repository includes a possible solution under the directory `CI`
- **Question:** What are limitations running with GitHub Actions?
**4. Install & configure CernVM-FS to get access to EESSI on a machine (10 minutes)**
(requires admin privileges on the machine ... or access EESSI via a container)
- To install & configure EESSI follow instructions at https://www.eessi.io/docs/getting_access/native_installation/
- To access EESSI via a container follow instructions at https://www.eessi.io/docs/getting_access/eessi_container/
- Verify access: `ls /cvmfs/software.eessi.io`
- Init EESSI: `source /cvmfs/software.eessi.io/versions/2023.06/init/lmod/bash`
- Run `module avail Python`
- **Question:** How could this be done easier?